This sprint centered around trying to add features and capabilities associated with the RPM Avatar that we use in myMO. The first major effort was associated with establishing a pipeline to take Poser based avatar animations and make them work for the RPM Avatar skeleton. We are doing this because we literally have thousands of Poser animations and poses available for the Poser avatar. I found and converted a number of musician and dance animations and poses to use in starting animations using this new pipeline. The pipeline that evolved goes through the following steps:
- Get in Poser and select the figure named Ryan
- Import either a bvh from Truebones or CMU or other sources
- Test the animation in Poser
- Export from Poser as an FBX as a multi-frame export
- Import FBX into Unreal engine importing the Skeleton, Mesh and Animation from the FBX
- Select the new Animation and Retarget it to the RPM Avatar using the Retargeting set up that mapped Poser bones to RPM bones
- This only works if you set up the Retarget Manager for the imported Skeleton
- You will still need to tweak the resulting Retargeted Animation to make it look good
Here is an example of the untweaked animation on the RPM avatar in Unreal Engine.
The second major effort was integrating the RPM Avatar Hub into the game. This augments/replaces having to create and save your avatar outside of the game in the RPM website and saving it to a glb file and then importing that glb url file into the game with a fully integrated application that runs inside of the actual game. This means that you never leave the game to create a new or tweak an existing avatar. Here is a video showing the new approach:
The third major set of tasks was to explore creating custom RPM avatar outfits so that we can make custom clothes for any RPM avatar and integrate this into the hub just integrated within myMO. The work flow for this is:
- Download there reference avatar fbx (body and head with no clothes on it).
- Delete the head
- Change the pivot point 90 degrees of the reference mesh
- Download a glb file of one of the outfits of an existing avatar you want to use as a starting point for modifying the clothing.
- Get both of these into Blender.
- Take the starting outfit and isolate meshes for top (shirt), bottom (pants) and footwear
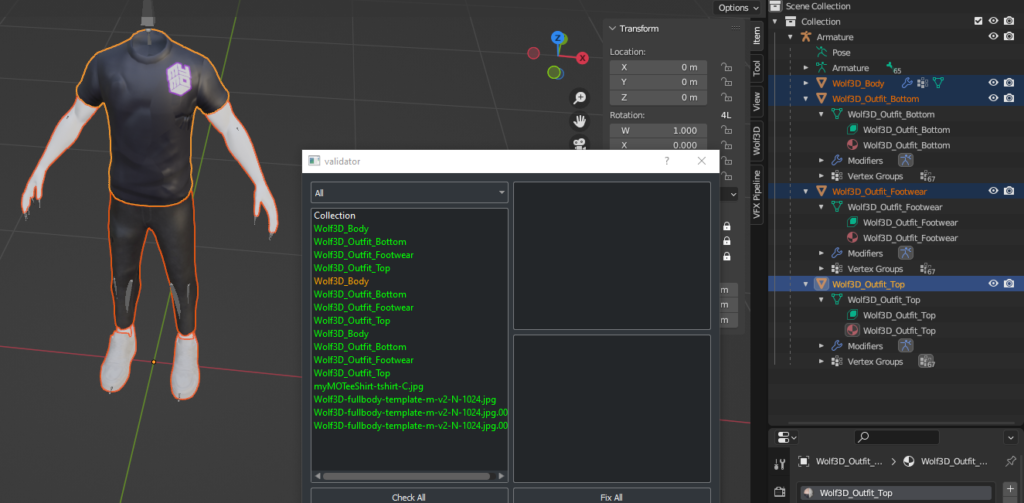
- Make the naming conventions what is required for uploading (look at outliner in the image below for naming conventions)
- Move the separate meshes for top, bottom and footwear so they are positioned on the Reference Avatar Armature
- Change geometry to what you want the new clothes to look like
- Change the UV maps and textures as desired
- Make sure the hierarchy looks just like the picture below
- Download the blender tools addons in their documentation
- Run the Validation Tool
- Fix any issues
- Do a skinning test animation and test for poke throughs and weight paint or adjust the clothes meshes as required
At this point, you should have an outfit to load to Ready Player Me. They have a tool called the Asset Manager to upload this new outfit so that it will show in the Avatar Hub that is integrated in myMO now and in our Partner Space (yes we have our own space in Ready Player Me). You can load this new validated outfit into RPM so that people that our in our Partner Space in RPM can select and wear this outfit in our game! This sprint I was only able to get through the Validation step in Blender. While doing the skinning test I noticed issues in the clothes that require welding seams, adjusting meshes for poke throughs and doing some weight painting beyond the default weight painting. I was not able to finish this all during the sprint and I have moved them to tasks in a future sprint to do. Here is a screen shot of the new custom outfit on the Reference RPM avatar showing the Validation tool results and the Armature / Mesh Hierarchies with the required naming conventions:
Each sprint I try to add a new level and for this sprint I added a new map called Mount Beats. It is a rugged mountain scene that has a dance stage at the top of one of the peaks. Here is a quick video showing it in action:
Lastly a minor change was made so that if you are playing an animation on your avatar and press the W,A,S,D keys your avatar will leave the animation playing and automatically load the Walk Cycle. This is more natural than having to go back to the animation menu and select the Walk Cycle.